Integrate with

Overview

The purpose of this section is to illustrate how the Embrava Device Management Systems(DMS) synchronizes workspace bookings with Maptician and the Embrava Desk Sign.

The main features of the solution include:

Desk Sign

The Desk Sign captures booking events at the workspace and sends these events to the Embrava Device Management System (DMS). The Embrava DMS then relays these events to Maptician using the Maptician API.

Embrava DMS

The Embrava DMS receives bookings events from Maptician and updates the associated Desk Sign accordingly.

Stored in Maptician

All user and seat information is stored in Maptician. No sensitive information is stored in the Embrava DMS. The Embrava DMS simply uses Maptician to gather booking information which is then removed once the booking has ended.

The following document describes the steps required to connect the Embrava DMS to your Maptician Instance.

Prepare Maptician

The purpose of this section is to detail the steps required to prepare Maptician to allow the Embrava DMS to connect and display Desk availability on the Embrava Desk Sign.

1.

Log in to your Maptician Portal.

2.

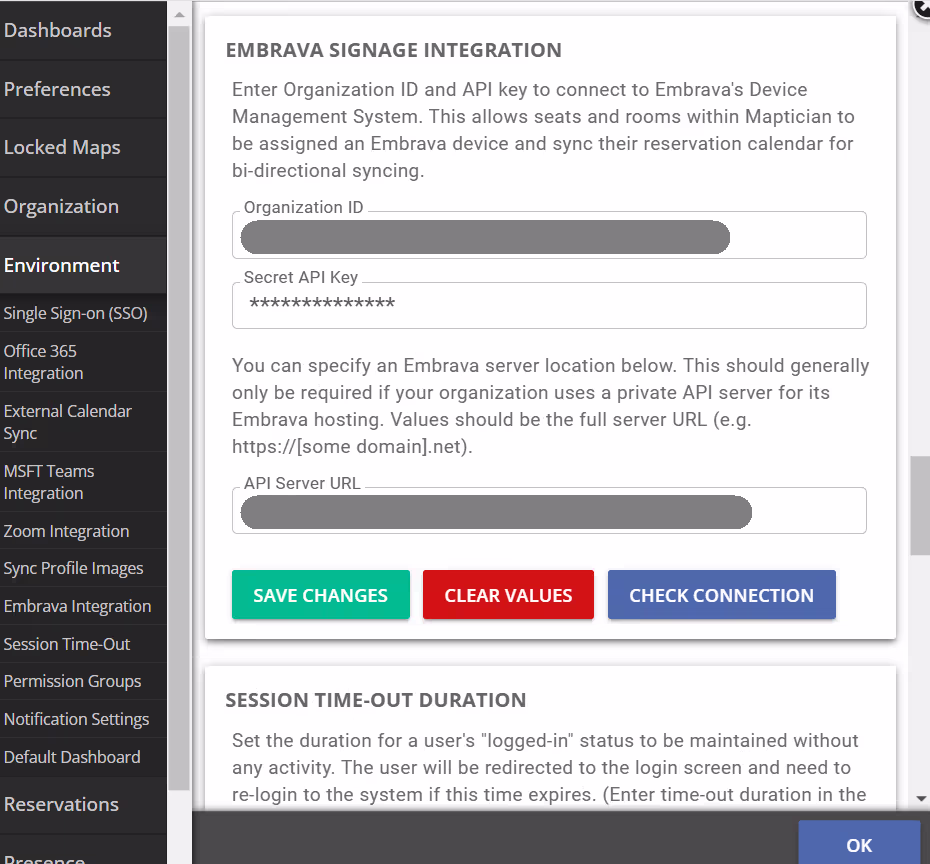
From the Main Menu, click Settings -> Environment from the menu as shown below:
Add Organization ID, Secret API Key and API Server URL from Embrava Device Management Portal as mentioned in Connect Embrava DMS to Maptician - Step 3  and save changes.

Connect Embrava DMS to Maptician

The purpose of this section is to describe how to connect the Embrava DMS to your Maptician instance.

Use the following steps to connect the Embrava DMS to your Maptician instance using the Signupwizard:

1.

Get started with Embrava: Login to the Embrava Device Management Portal at https://portal.embrava.com

2.

Connect your Platform: Follow the Wizard until you get to Step 2 – Connect your Platform. Select API as your Platform and click Next as shown below:

3.

Maptician Account Authentication: Secret Key and Organization ID will be given in the Details page which is used to prepare Maptician to allow the Embrava DMS to connect and display Desk availability on the Embrava Desk Sign.

4.

Connection Successful: Click Complete Step 2 to finalize the Embrava DMS connection with your Maptician instance.

You are now ready to create a default Desk Sign configuration.

5.

Desk Sign Configuration: Once you have successfully connected your Embrava DMS to your Maptician instance, you must create a default Desk Sign configuration so that when your Desk Signs are first powered and connected to a network they will pull down and use this configuration from the Embrava DMS.    

Create a default Desk Sign configuration by Completing Step 3 of the setup wizard as shown below:

  • Enabled Components – Enable network and card reader components.

  • Network: Choose the network type the Desk Sign should use to connect to the Embrava DMS.

  • Card Reader: Enable the 125KHz or 13.56MHz card reader based on the security badge you will use.
  • Wi-Fi Details – Specify credentials if connecting the Desk Sign to a Wi-Fi network.
  • Alert Settings – Different settings that control the state of the Desk Sign.
  • Alert mode: Specifying if the device will display workspace or user availability.

  • Booking duration: The default booking duration that is used when a user taps their security badge to create a booking on the Desk Sign. A value of ‘0’ creates a reservation for the full day. 

  • Ending Alert Time: The amount of time remaining in a reservation where the Desk Sign will change to the Ending state to alert the user that their reservation is about to end.  

  • Enable Clean state: Display the Requires Cleaning state when a checked-in reservation has ended.
  • Display Settings – Used to control what is displayed on the Desk Sign screen.

  • Name Display: Toggle between displaying the name of the event/reservation and the owner of the reservation.

  • Anonymize Name: Prevent the name of the reservation from being displayed on screen to keep the reservation private.
  • Time Settings – Specify the time format and time servers the Desk Sign should use to synchronize and display time.
  • Workspace Status Settings – Define which colors the Desk Sign should use to depict the workspace status: Available, Reserved, Checked-In or Ending.

Once you have created your default Desk Sign configuration you are ready to map the Desk Signs to a Seat in Maptician.

6.

Add/Import Devices: Embrava ID is the Serial no printed on the back of the desk sign device. Devices can be added using the Bulk import option or as individual desk signs. And it is also possible to add desk signs from the dashboard as well. The CSV template is available on the page, and the same can be uploaded after adding the Embrava IDs. Once the devices are uploaded click on Complete Step 4. Upon adding the devices click on Complete Step 4 button.

Note: Devices can also be added on a later period from the dashboard.

7.

Network Configuration: Under the Prepare Network and Configure Desk Signs tab, you can read about generic information about the network details required for Embrava desk sign and boot up process. Now you can click on Complete Step 5.

8.

Installation Guide: Step 6 will take you through the Installation guide and with that you are all set. Click on the Complete Step-6 button and you will be taken to the dashboard.