Integrate with

Overview

The purpose of this section is to illustrate how the Embrava Device Management Systems (DMS) synchronizes workspace bookings with OfficeSpace and the Embrava Desk Sign.

The main features of the solution include:

Desk Sign

The Desk Sign captures booking events at the workspace and sends these events to the Embrava Device Management System (DMS). The Embrava DMS then relays these events to the OfficeSpace using the OfficeSpace API.

Embrava DMS

The Embrava DMS receives bookings events from OfficeSpace and updates the associated Desk Sign accordingly.

Stored in OfficeSpace

All user and seat information is stored in OfficeSpace. No sensitive information is stored in the Embrava DMS. The Embrava DMS simply uses OfficeSpace to gather booking information which is then removed once the booking has ended.

The following document describes the 5 steps required to connect the Embrava DMS to your instance of OfficeSpace

1. Prepare OfficeSpace

The purpose of this section is to detail the steps required to prepare OfficeSpace to allow the Embrava DMS to connect and display Desk availability on the Embrava Desk Sign.

Two steps are required to prepare OfficeSpace for a connection with the Embrava DMS:

1.

Generate API Token: Which the Embrava DMS will use to authenticate against your OfficeSpace instance when synchronizing Desk reservations.

2.

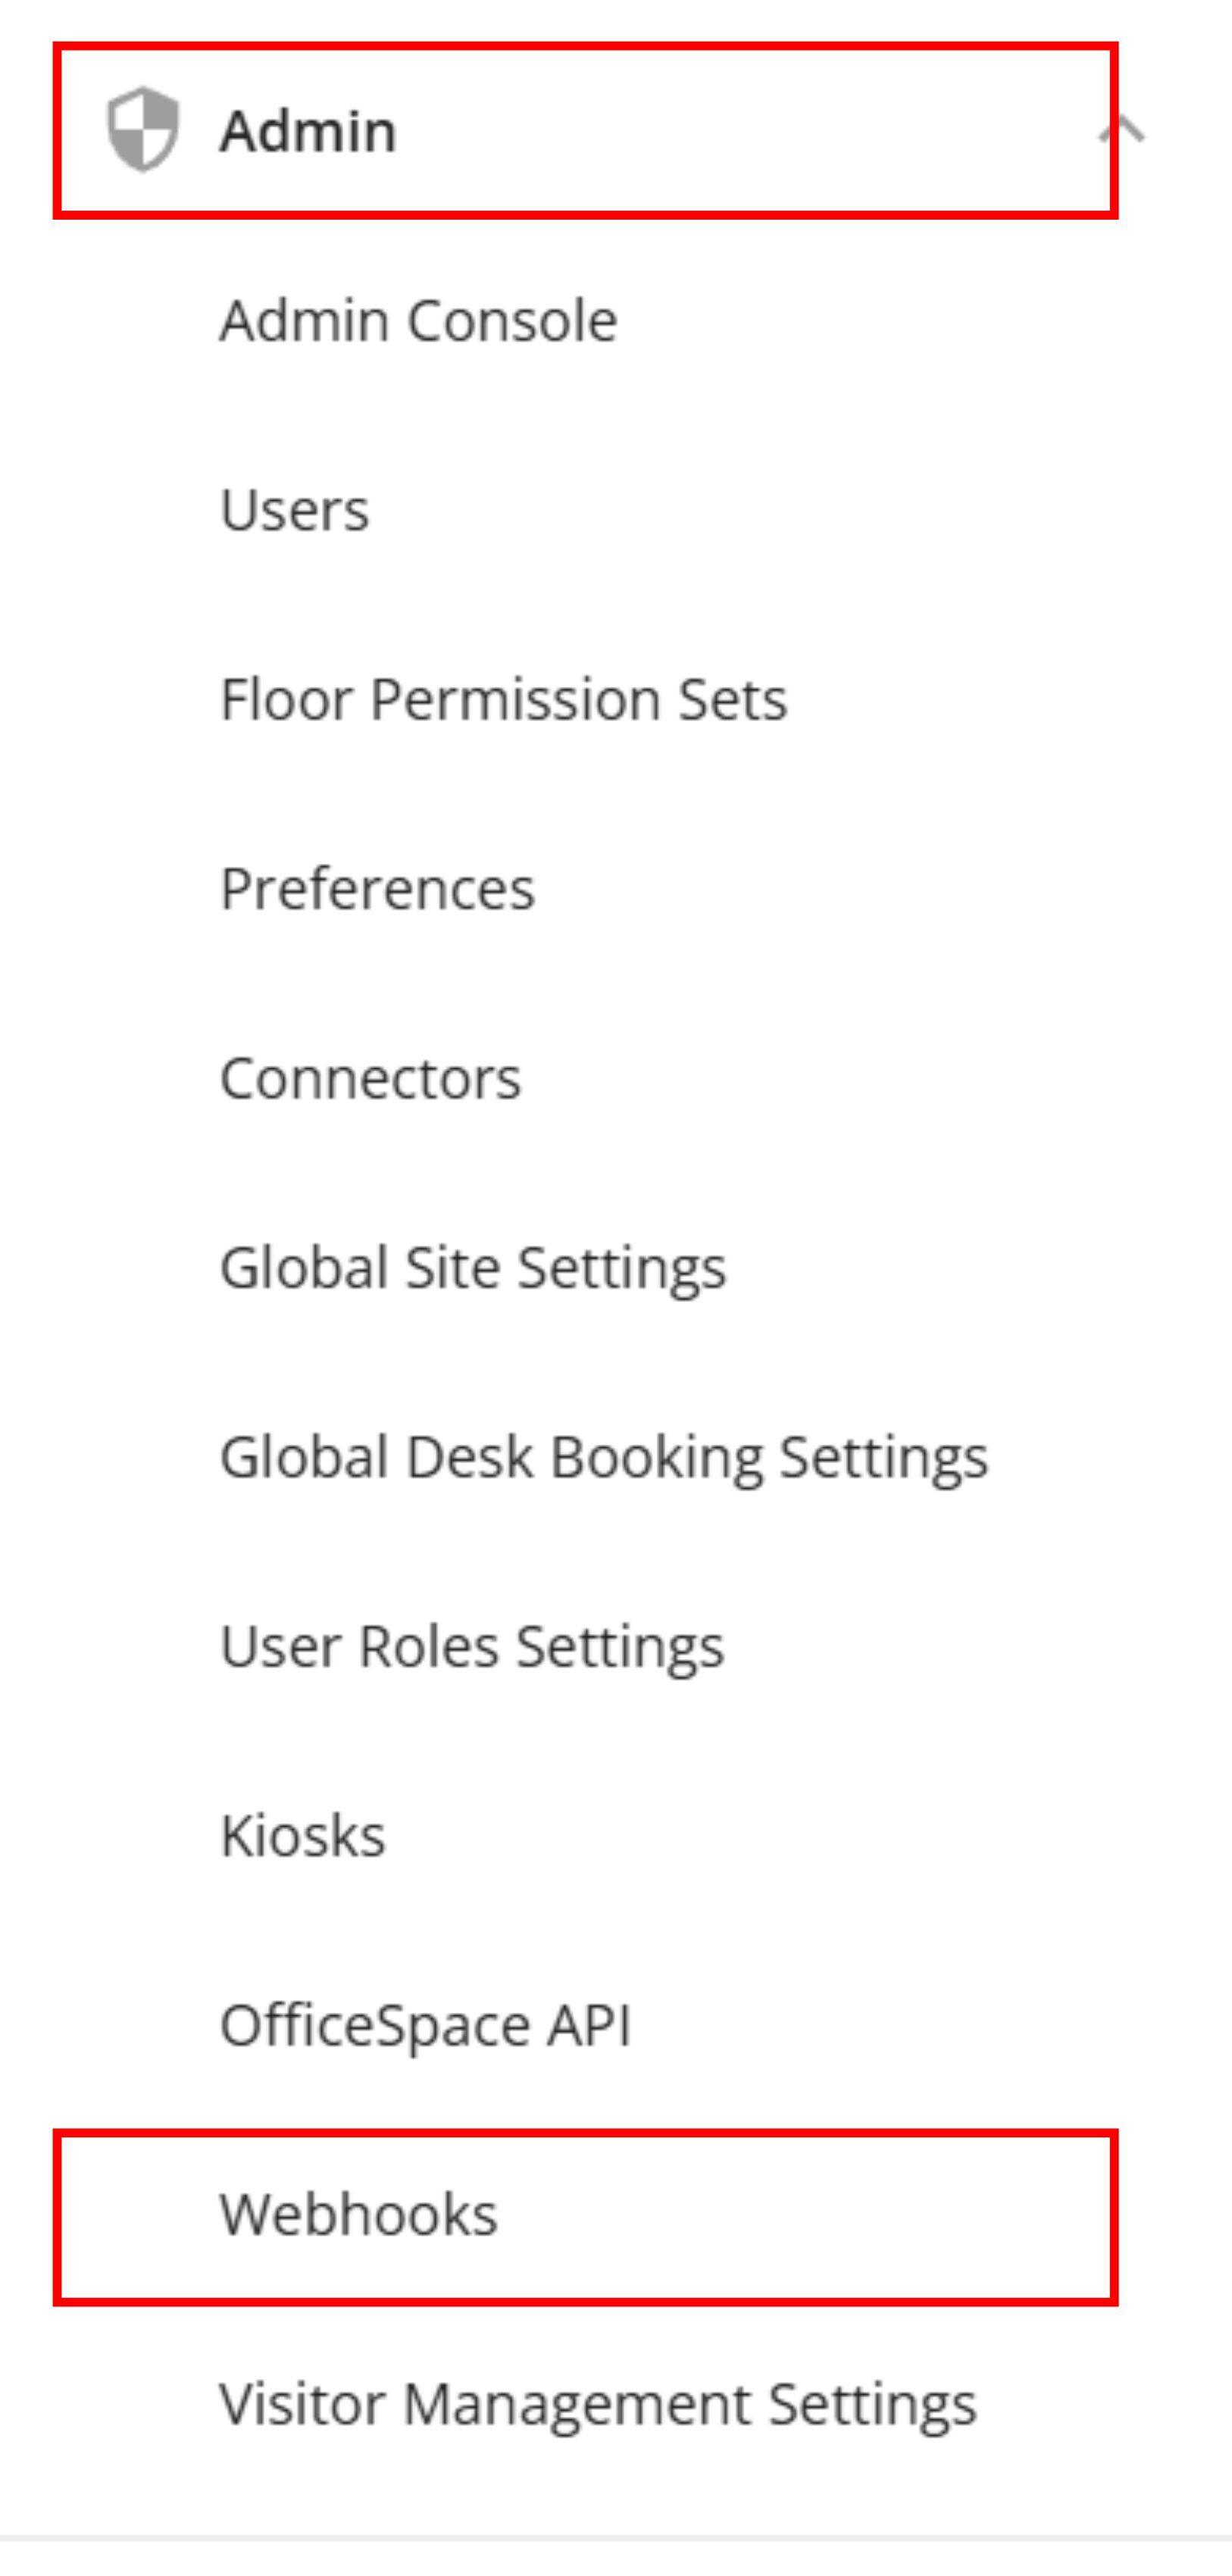
Register Webhooks: So OfficeSpace can post booking events to your Embrava DMS so your Desk Signs can display the appropriate workspace state.

These steps are detailed further below.

Generate API Token

For the Embrava DMS to identify your OfficeSpace instance on the OfficeSpace platform, the Embrava DMS requires your unique OfficeSpace Account ID.

Follow the steps below to gather your OfficeSpace Account ID:

1.

Log in to your OfficeSpace Portal.

2.

From the Main Menu, click Admin -> OfficeSpace API from the menu as shown below:

3.

Under the API Keys section click Generate API Key as shown below:

4.

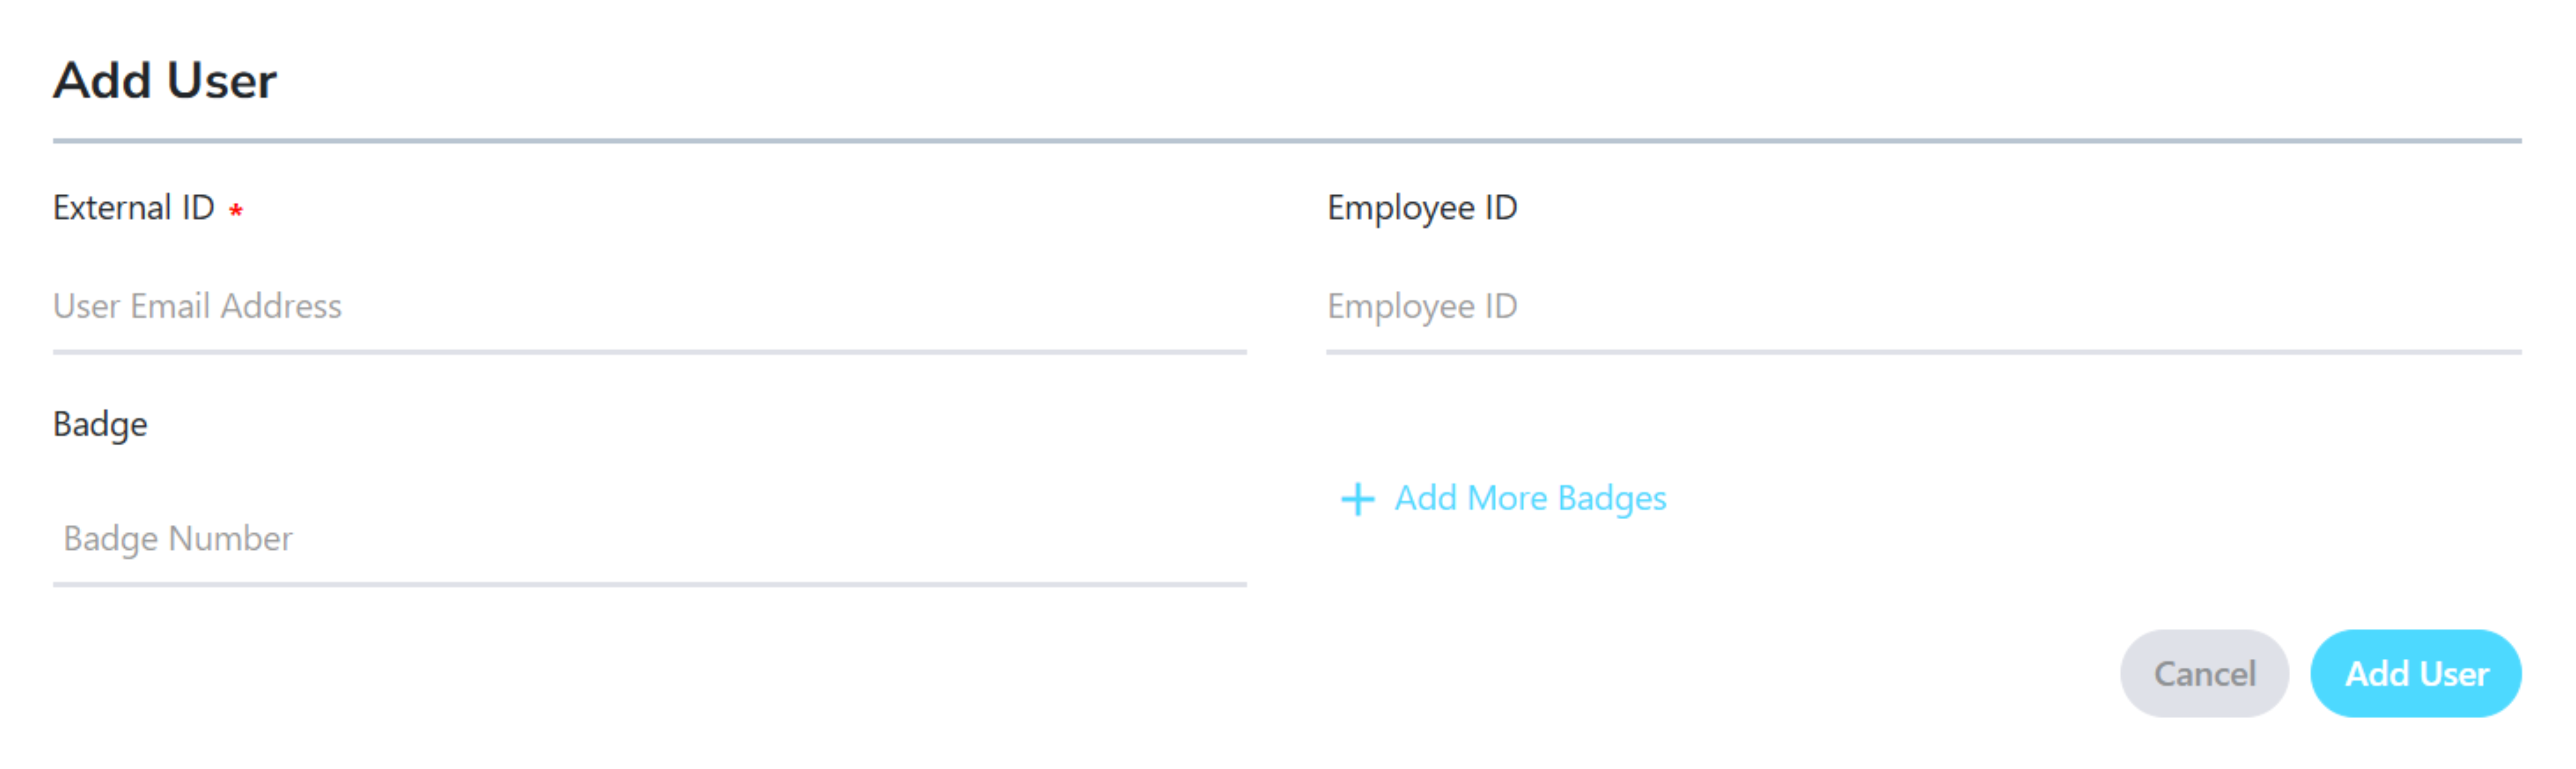
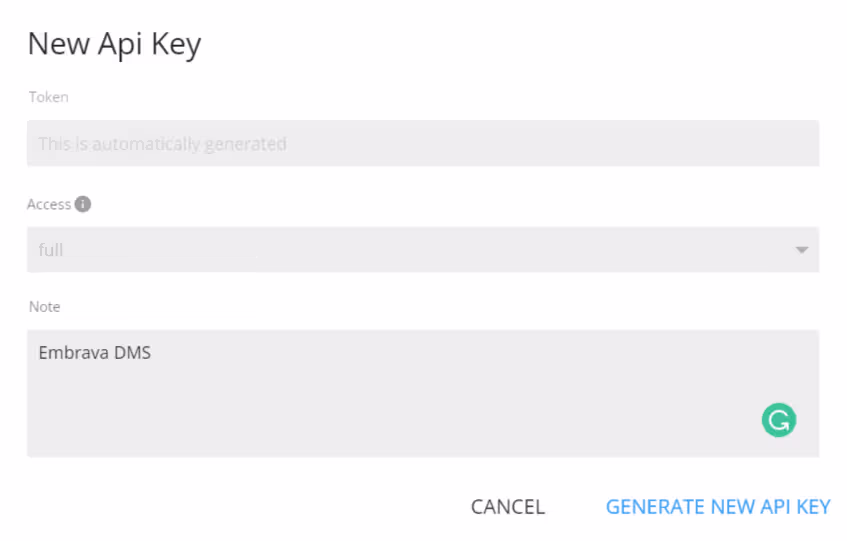
Select Access as Full and enter a Note to define your key and click Generate New API Key.

Register Webhooks

To enable your OfficeSpace tenant to send booking events to the Embrava DMS so they can be displayed on the Desk Sign, webhooks must be configured on your OfficeSpace tenant.

Follow the steps to register the different webhooks for the various booking events:

1.

Log in to your OfficeSpace Portal.

2.

From the Main Menu, click Admin -> Webhooks from the menu as shown below:

3.

Create eight (8) new Webhooks for each Desk Booking event as illustrated in the tables below:


Note: The Organization ID required for each webhook can be found in your Embrava DMS Portal under Account -> Organization Details -> Org ID as shown below:

Your webhooks should look as follows once completed:

This completes the OfficeSpace preparation steps. You are now ready to connect your Embrava DMS to your OfficeSpace instance.

2. Connect Embrava DMS to OfficeSpace

The purpose of this section is to describe how to connect the Embrava DMS to your OfficeSpace instance.

Use the following steps to connect the Embrava DMS to your OfficeSpace instance:

1.

Login to the Embrava Device Management Portal at https://portal.embrava.com

2.

Follow the Wizard until you get to Step 2 – Connect your Platform. Select OfficeSpace as your Platform and click Next as shown below:

3.

Enter the API Key gathered in Section 1 – Prepare OfficeSpace. Check the Allow Embrava DMS to sync OfficeSpace users every 24 hours if you wish to have the Embrava DMS automatically synchronize users as they are created in OfficeSpace.

4.

Once you have entered the API Token, click Test Connection to confirm that the Embrava DMS can now communicate with your OfficeSpace instance.

5.

Once the connection is tested successfully, click Complete Step 2 to finalize the Embrava DMS connection with your OfficeSpace instance.

You are now ready to create a default Desk Sign configuration.

3. Create Desk Sign Configuration

Once you have successfully connected your Embrava DMS to your OfficeSpace instance, you must create a default Desk Sign configuration so that when your Desk Signs are first powered and connected to a network they will pull down and use this configuration from the Embrava DMS.

Create a default Desk Sign configuration by completing Step 3 of the setup wizard as shown below:

  • Enabled Components – Enable network and card reader components.

  • Network: Choose the network type the Desk Sign should use to connect to the Embrava DMS.

  • Card Reader: Enable the 125KHz or 13.56MHz card reader based on the security badge you will use.
  • Wi-Fi Details – Specify credentials if connecting the Desk Sign to a Wi-Fi network.
  • Alert Settings – Different settings that control the state of the Desk Sign.

  • Alert mode: Specifying if the device will display workspace or user availability

  • Booking Duration: The default booking duration that is used when a user taps their  security badge to create a booking on the Desk Sign. A value of ‘0’ creates a reservation for the full day. 

  • Ending Alert Time: The amount of time remaining in a reservation where the Desk Sign will change to the Ending state to alert the user that their reservation is about to end.  

  • Enable Clean state: Display the Requires Cleaning state when a checked-in reservation has ended.
  • Display Settings – Used to control what is displayed on the Desk Sign screen.

  • Name Display: Toggle between displaying the name of the event/reservation and the owner of the reservation.

  • Anonymize Name: Prevent the name of the reservation from being displayed on screen to keep the reservation private.
  • Time Settings – Specify the time format and time servers the Desk Sign should use to synchronize and display time.
  • Workspace Status Settings – Define which colors the Desk Sign should use to depict the workspace status: Available, Reserved, Checked-In or Ending.

Once you have created your default Desk Sign configuration you are ready to map the Desk Signs to a Desk in OfficeSpace.

4. Map Desk Signs to Desks in OfficeSpace

The purpose of this section is to illustrate how Desk Signs are mapped to Desks in OfficeSpace.

For a Desk Sign to manage the availability of a Desk in OfficeSpace, the Desk Sign must be mapped to that Desk within the Embrava DMS.

Use the steps below to map Desk Signs to Desks in OfficeSpace:

1.

Login to the Embrava Device Management Portal at https://portal.embrava.com

2.

Select “Devices” in the main menu. Create a new Device by clicking the “Add Device” button as shown below.

3.

When adding a new device, enter the serial number of the Desk Sign as the ID and then use the Desk search to find the desk you wish to map the Desk Sign and click Add Device as shown below:

4.

Once added you will see the new device listed with its mapped Desk as shown below.

The device will automatically inherit the default configuration you prepared in Section 3 – Create Desk Sign configuration. Click the Edit icon as shown below if you wish to customize the configuration of your newly added device.

5.

Repeat steps 2-3 above for all Desk Signs you would like mapped to a Desk in OfficeSpace.
    

Note: For bulk mapping of Desk Signs to Desks in OfficeSpace, please complete the appropriate CSV as per our Installation Guide and provide this completed CSV to our support team on support@embrava.com.

Now all your Desk Signs are mapped to Rooms in OfficeSpace, you must now add users to your Embrava DMS so that any reservations for Rooms your users create will then be displayed on the Desk Sign.

5. Adding Users

The purpose of this section is to describe how users and their badge numbers are added to the Embrava DMS.

When integrating with OfficeSpace, all user data is held within the OfficeSpace user repository. Since OfficeSpace is yet to support badge numbers/employee IDs, we must map badge numbers to OfficeSpace users within the Embrava DMS.

To add a OfficeSpace user to the Embrava DMS and assign them a badge number and employee ID so that they can tap a security badge or enter an ID to book a space, please following the steps below:

1.

Login to the Embrava Device Management Portal at https://portal.embrava.com

2.

Select “Users” in the main menu and click “Add User” as shown below:‍

3.

Enter the Email Address of OfficeSpace user as the External ID and enter their badge number and employee ID as shown below:

4.

This user can now tap their security badge on the Desk Sign to automatically create a Desk reservation in OfficeSpace.

With Desks mapped to devices and users added to your Embrava DMS, your Embrava Desk Signs are now ready to manage the availability of your agile workspaces.