.svg)


.svg)
.svg)
1. Prepare ServiceNow
The purpose of this section is to detail the steps required to prepare ServiceNow to allow the Embrava DMS to connect and display workspace availability on the Embrava Desk Sign.
Three steps are required to prepare ServiceNow for a connection with the Embrava DMS:
1.
Load Embrava Workplace Reservations: Deploy the Embrava Workplace Reservations ServiceNow Update Set.
2.
Configure Embrava Workplace Reservations: Create API User and define the API properties of the Embrava Workplace Reservations application.
3.
Map Desk Signs to Workspaces: Assign Desk Signs to Workspaces in ServiceNow using the Embrava ID/Serial Number.
4.
Assign Badge Numbers to Users: Add Badge Numbers to users in ServiceNow to allow users to create/check-in to a reservation from the Desk Sign.
Load Embrava Workplace Reservations
For the Embrava DMS to send/receive workspace reservations to/from ServiceNow, the Embrava Workplace Reservations Update Set needs to be deployed on your ServiceNow tenant.
Note: The following pre-requisites must be in place to install and configure the Embrava Workplace Reservations application:
- The Workplace Reservation Management plugin must be installed.
.avif)
- The user installing and configuring the Embrava Workplace Reservations application must have the admin role.
Use the steps below to install the Embrava Workspace Reservations app onto your ServiceNow tenant:
1.
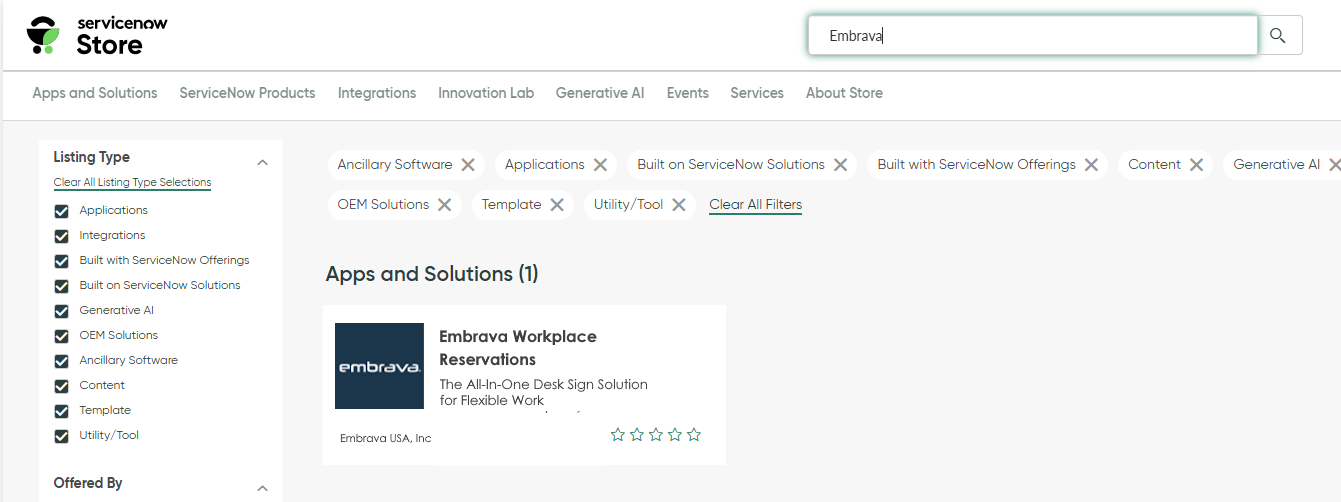
Browse to the ServiceNow Store at https://store.servicenow.com/ and log in.
2.
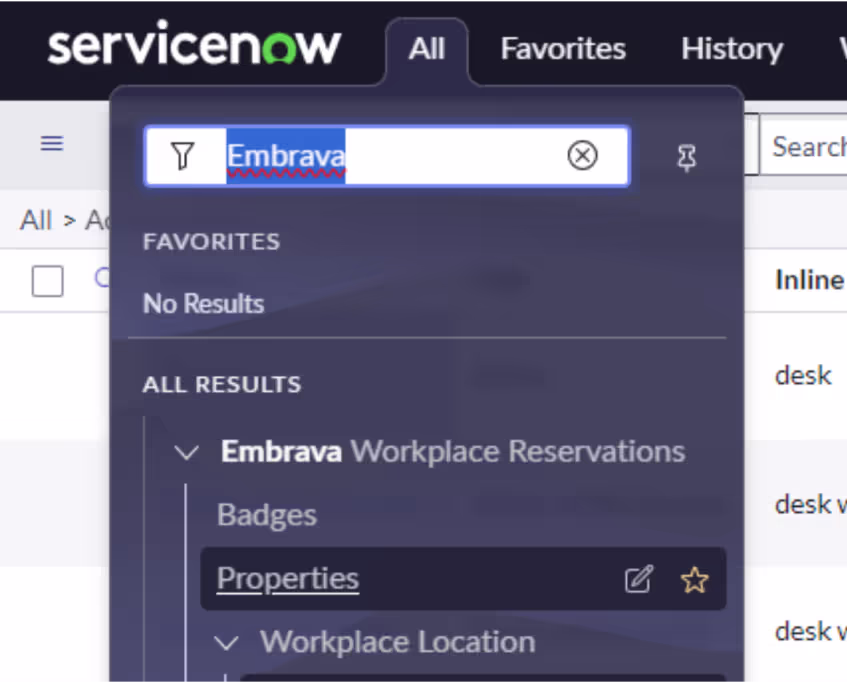
Search “Embrava” in the App search bar and click the Embrava Workplace Reservations app as shown below:
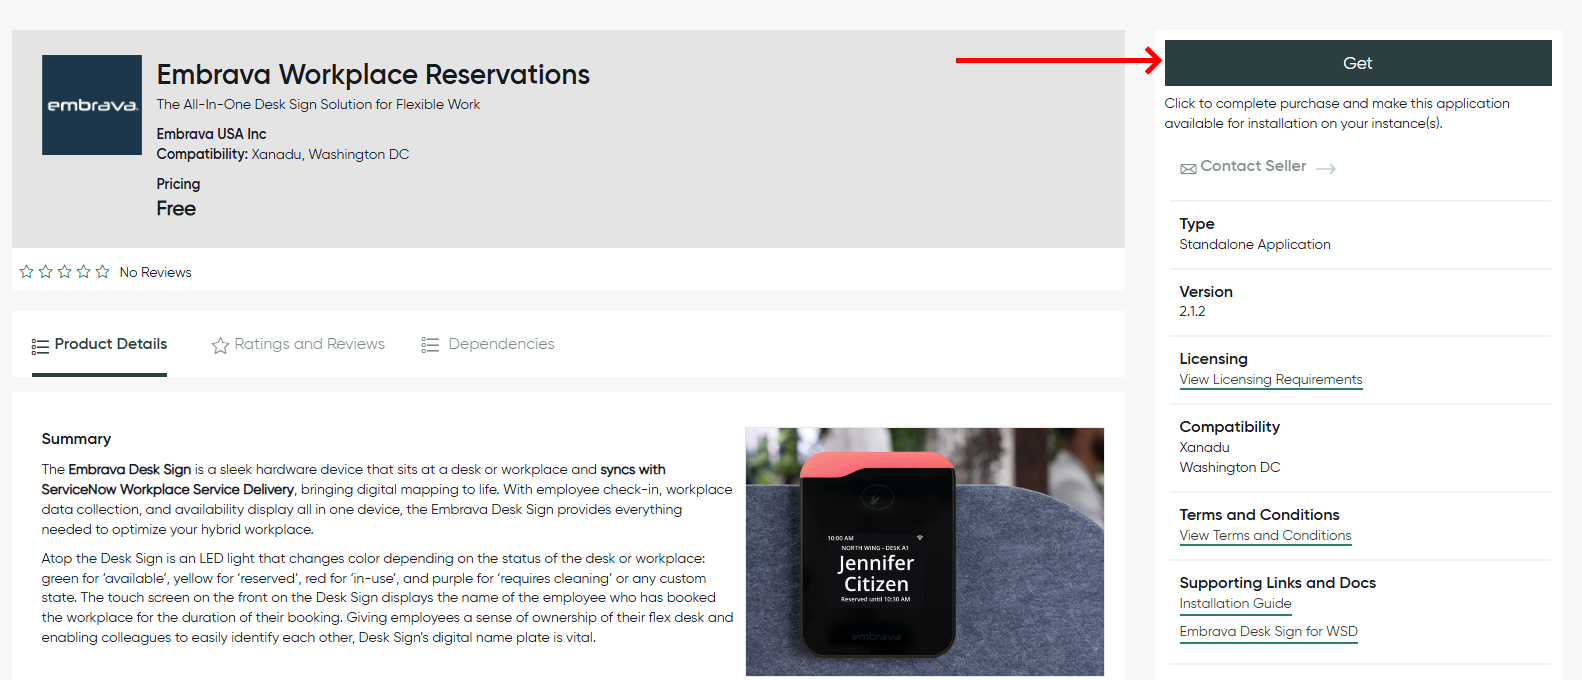
3.
Click “Get” as shown below and follow the steps to install Embrava Workplace Reservations onto your desired instance.
4.
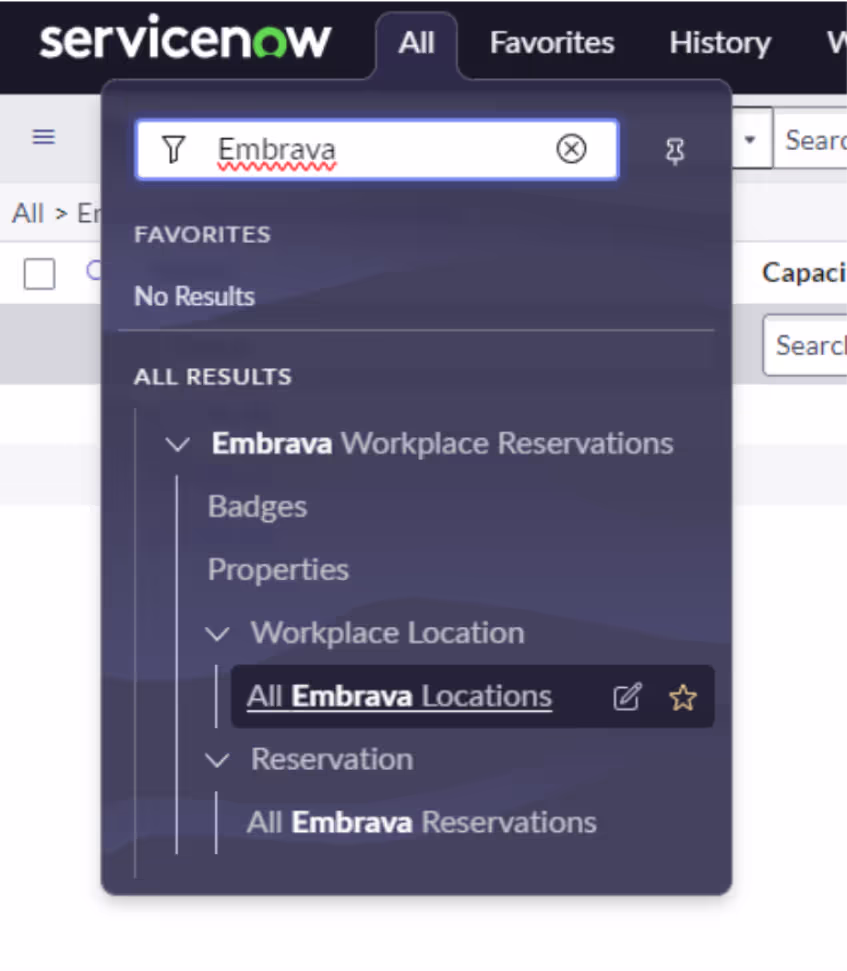
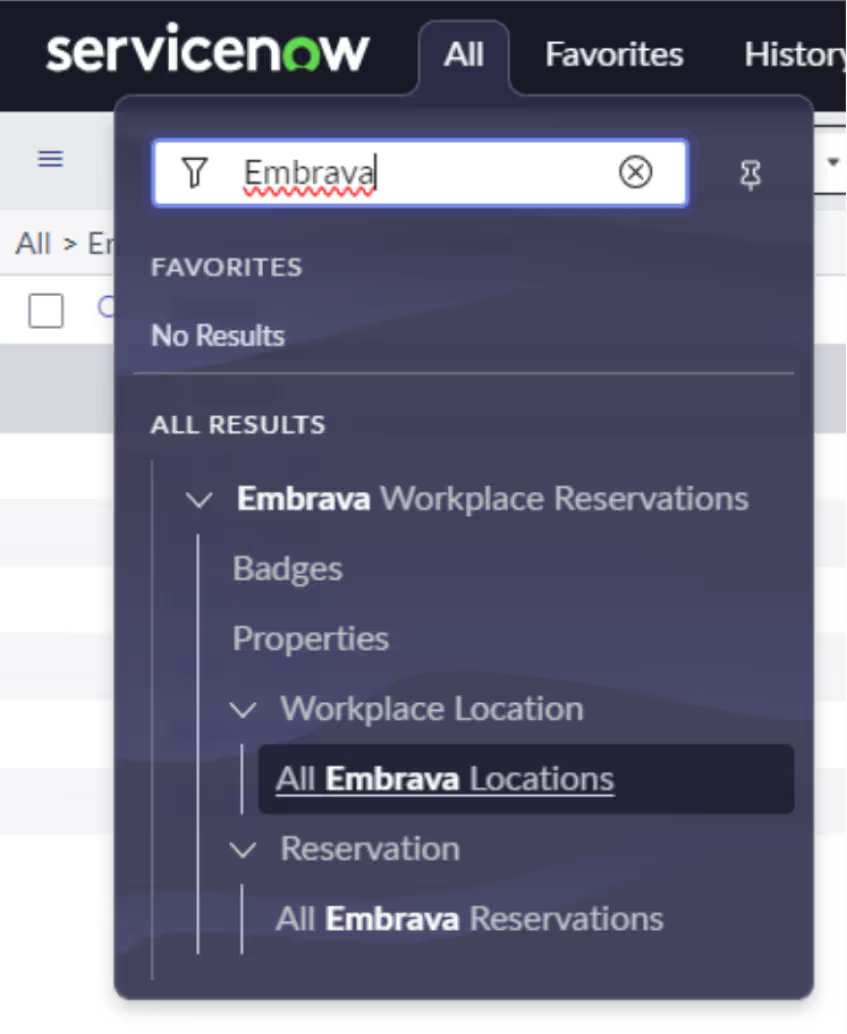
Once Embrava Workplace Reservations has now been installed, familiarize yourself with the Embrava Workplace Reservations application menu by opening the All menu and filtering to “Embrava”.
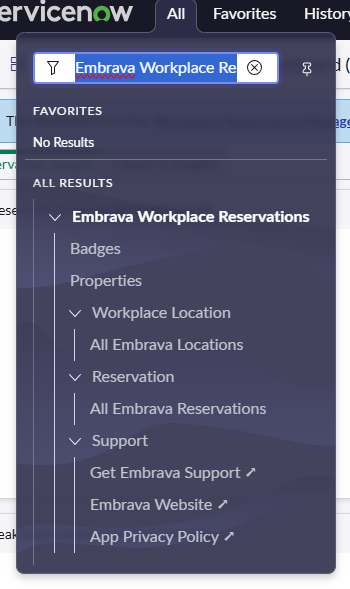
- Badges – Manage the badge numbers for employees used to create reservationsby tapping their badge on the Desk Sign. Badges are accessible to system adminsand users with the following roles:
- x_emus2_embrava_wr.embrava_wr_admin
- x_emus2_embrava_wr.badge_user.
- Properties – Configurable settings for authentication, API endpoints, etc.
- All Embrava Locations – Lists workplace locations with an Embrava Device ID
- All Embrava Reservations – Lists all workplace reservations against locations withan Embrava Device ID.
- Support – Provides useful links to Embrava Support and Privacy Policy
You’re now ready to configure the Embrava Workplace Reservations application to allow your Embrava DMS to connect to your ServiceNow instance.
Configure Embrava Workplace Reservations
To allow your Embrava DMS to connect to your ServiceNow instance and begin displaying reservations the following configurations are required:
1. Create Embrava API User – To authenticate API calls from the Embrava DMS.
2. Define Reservable Module – Define the reservable modules that the Embrava DMS will create reservations for.
3. Enter Embrava DMS API properties – To authenticate API calls from ServiceNow.
Create Embrava API user
The Embrava DMS will send data to the ServiceNow instance. Create a user in the sys_user table that will be used to authenticate the API calls from the Embrava DMS.
Follow these steps to create and configure the Embrava API User:
1.
Create a user record as described below:

Notes:
- The user should be granted the admin role. Alternatively, they can be granted the roles
sn_wsd_core.admin, sn_wsd_rsv.admin and x_emus2_embrava_wr.embrava_wr_admin. - The user will usually be set to “Web service access only” to prevent the account from logging in using the login page.
2.
Set the User Password
a. Make note of the User ID and Password of this user as it will be used to configure the Embrava DMS in Section 2 – Connect Embrava DMS to ServiceNow.
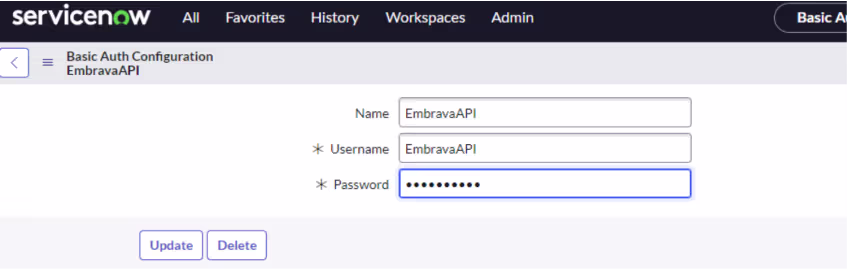
3.
Navigate to the Basic Auth Configuration page by opening the All menu and in the filter box type “sys_auth_profile_basic.list”. Then hit Enter.
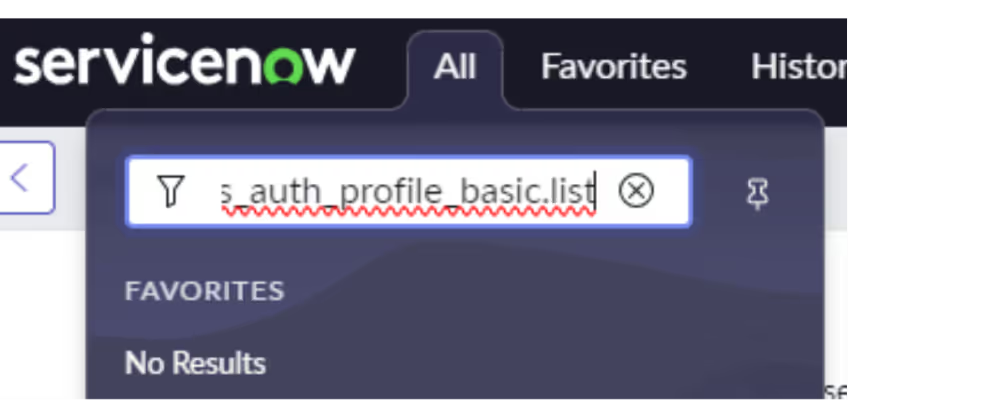
4.
Open the EmbravaAPI record.
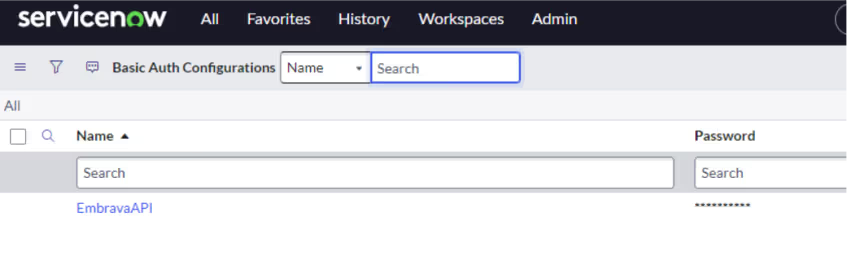
5.
Update the password to match the password used to create the user record.
You have now configured your Embrava API user. You are now ready to define your Reservable Module.
Define Reservable Module
A Reservable module groups similar types of workplace items. Employees can view these similar items in one category. For example, a room is a reservable module and it contains similar workplace items like meeting rooms, conference rooms, and other rooms.
The Embrava Workplace Reservation application is configured to reserve spaces within a Reservable Module. For more information on creating Reservable Modules please see Reservable Modules.
Follow these steps to configure the Reservable Module the Embrava Workplace Reservation application will use:
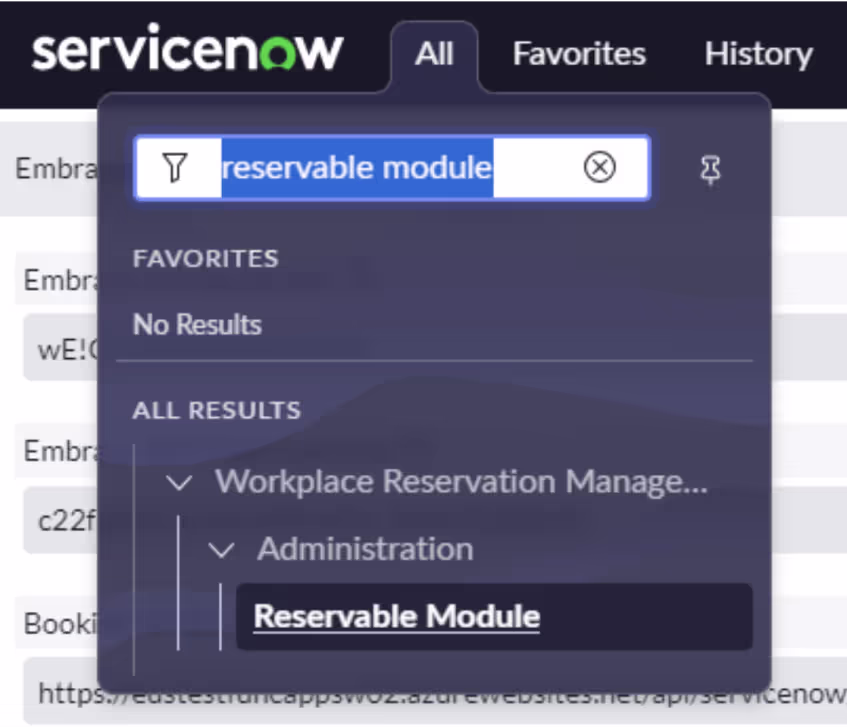
1.
Open the Reservable Module list through the menus All → Workplace Reservation Management → Reservable Module (or search for “Reservable Module” in the filter navigator)
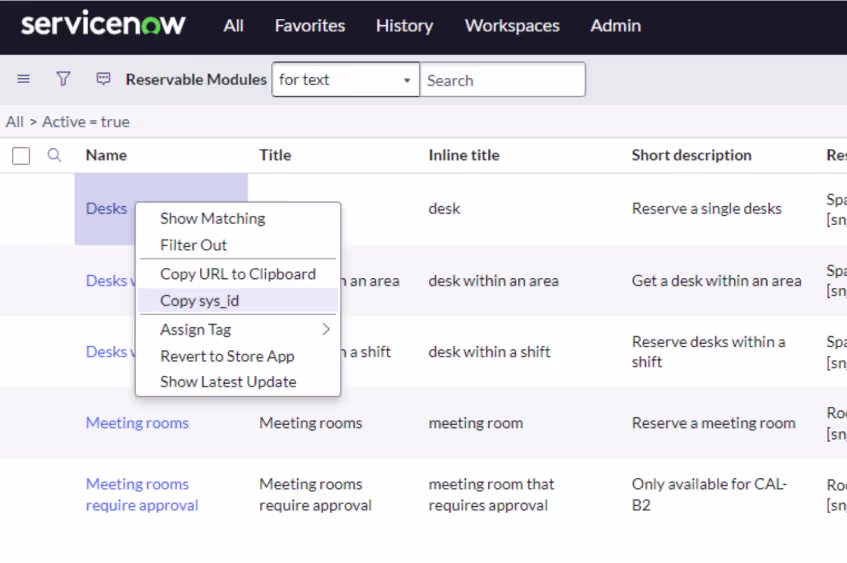
2.
Identify the Reservable Module type to use with the Embrava Workplace Reservation application. Right click on the module name and select “Copy sys_id”. Save this value for later. This value is the unique identifier for this record, called a “sys_id”.
Note: The user must have the “admin” role to perform this function.
3.
Navigate to the Embrava Workplace Reservations application menu and select Properties.
4.
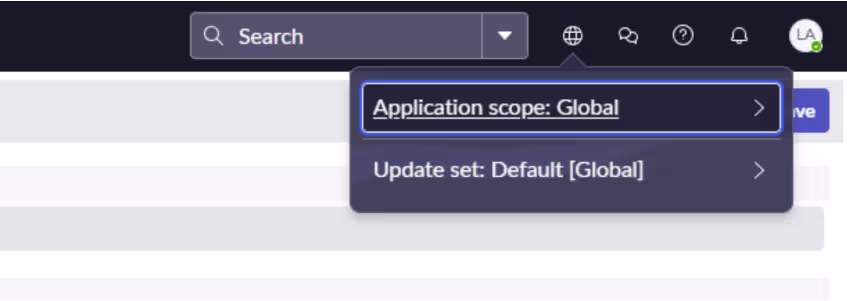
To edit these properties the administrator must switch to the Embrava application scope. To change the scope, click on the globe icon at the top-right side of the window.
5.
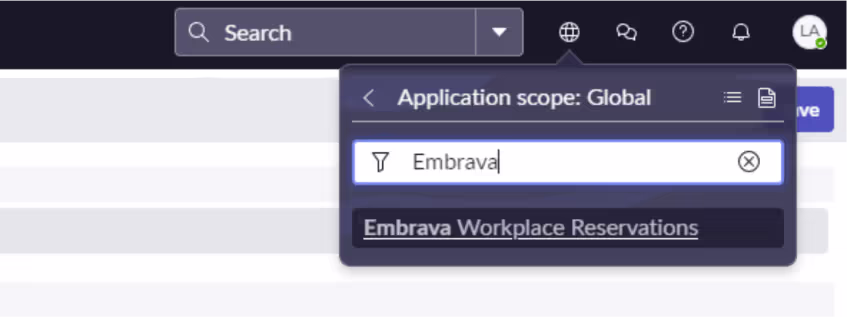
Click on “Application Scope”, filter the list of applications to “Embrava” and Click on “Embrava Workplace Reservations”.
6.
Now that the application scope has been switched to “Embrava Workplace Reservations” the system properties have become editable. Paste the sys_id value of the Reservable Module, identified in Step 2 above, into the property called “The sys_id of the Reservable Module”.

7.
Click “Save”.
Your Embrava Workplace Reservation Module has now been configured. You’re now ready to enter your Embrava DMS API Properties.
Enter Embrava DMS API Properties
So that your ServiceNow tenant can send workspace reservations securely to the Embrava DMS, you must set within your Embrava Workspace Reservations application your specific endpoint and credentials defined by Embrava.
Follow these steps to configure your Embrava DMS API Properties:
1.
Jump to Section 2 – Connect Embrava DMS to ServiceNow and complete steps 1-3 to gather the values for the below parameters.
2.
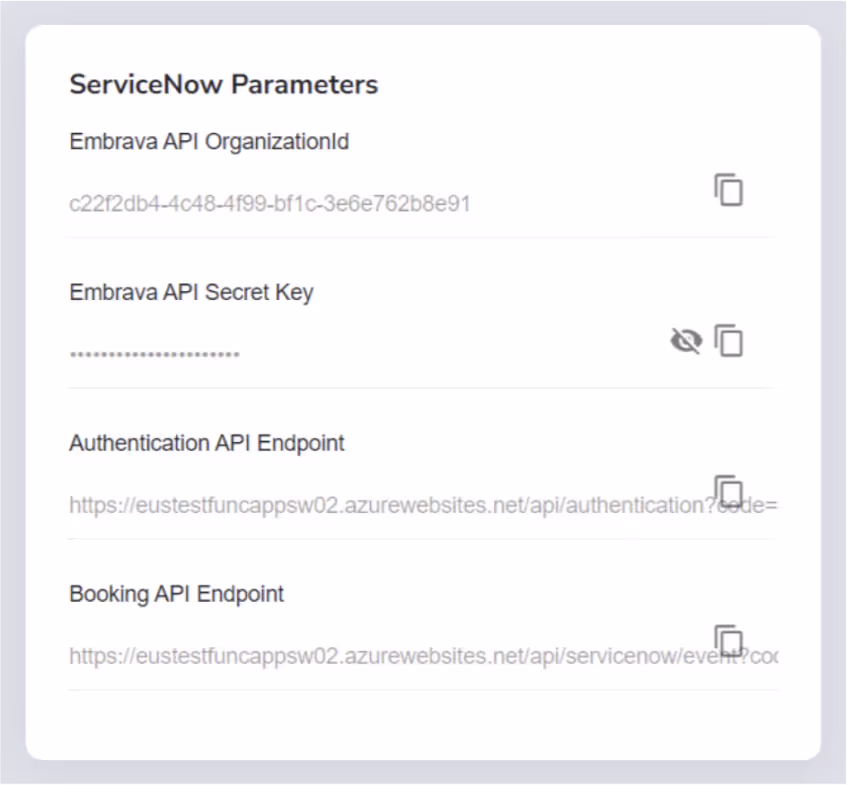
While you are still modifying the Global Embrava Workplace Reservations Properties from the Define Reservable Module section above, enter the values gathered in Step 1 into the following parameters and click “Save”.
- Embrava API Secret Key
- Embrava API OrganizationId
- Booking API Endpoint
- Authentication API Endpoint
.avif)
Your Embrava DMS API Properties are now set and you’re now ready to map Desk Signs to workspaces in ServiceNow.
Map Desk Signs to Workspaces
For a Desk Sign to manage the availability of a workspace in ServiceNow, the Desk Sign must be mapped to that workspace within ServiceNow.
Use the steps below to map Desk Signs to workspaces in ServiceNow:
1.
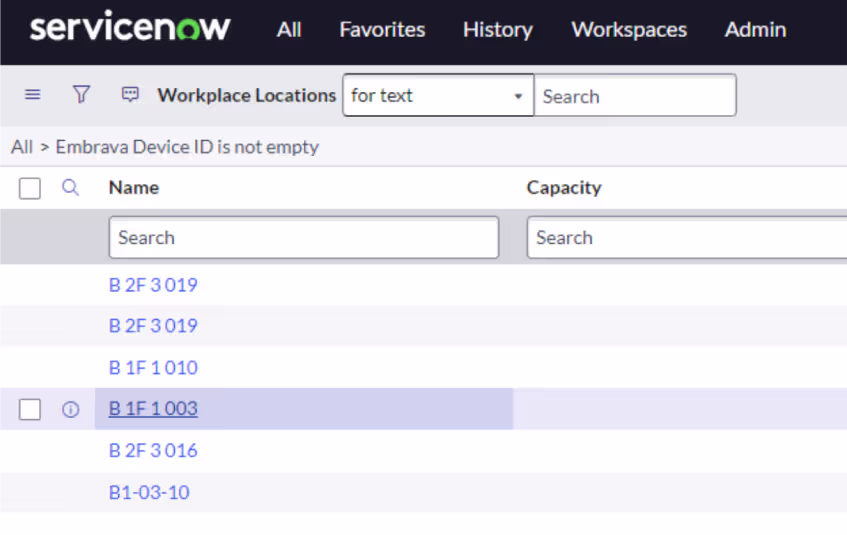
Open the list of “Workplace Spaces” through All → Workplace Reservation Management → Administration → Workplace Spaces.
.avif)
2.
Personalize your list of Spaces to show the “Embrava Device ID” column by clicking on the gear icon and moving the column “Embrava Device ID” from the list on the left to the list on the right and clicking “OK”.
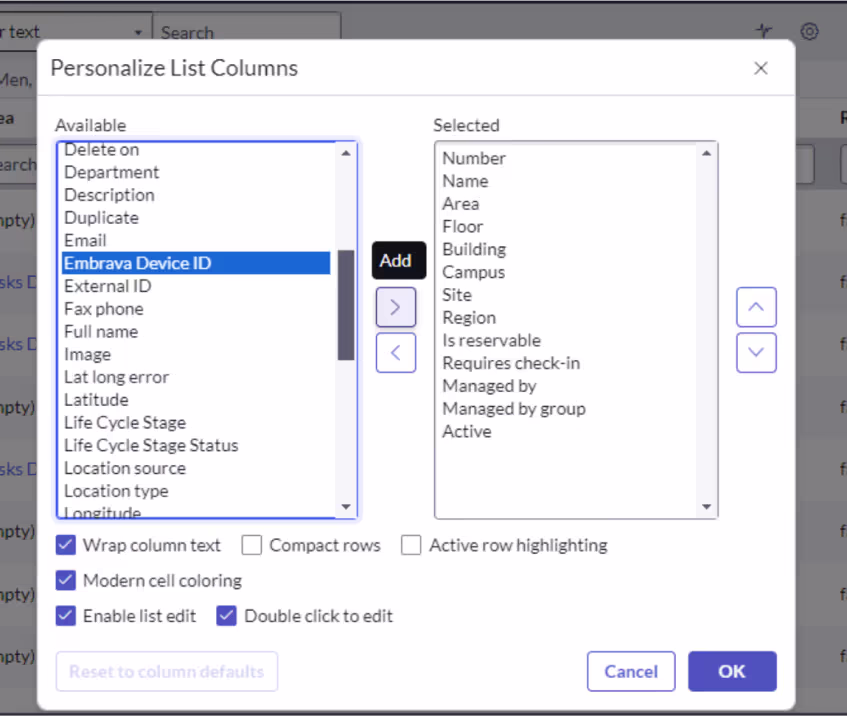
3.
Assign the “Embrava Device ID” to each space by double clicking on the “Embrava Device ID” field for each row in the list, entering the assigned Desk Sign serial number, and clicking on the green checkmark.

4.
Repeat for each space that you wish to assign a Desk Sign to.
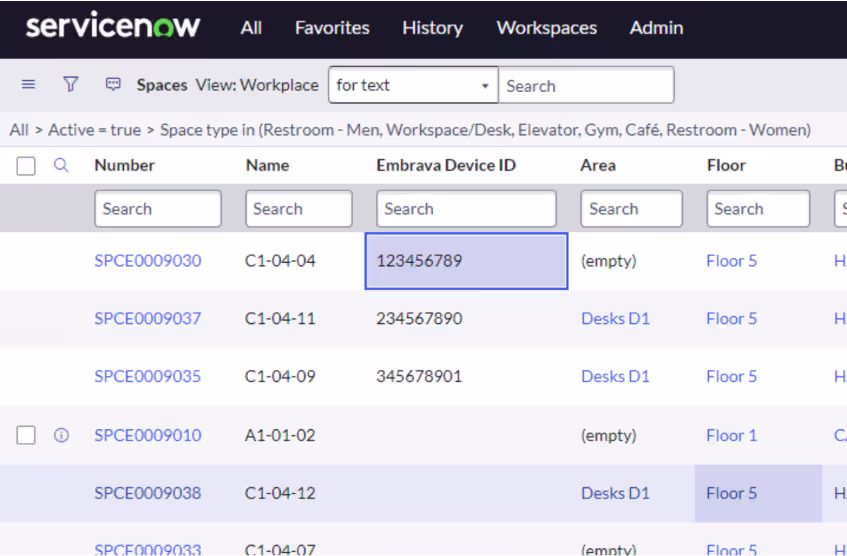
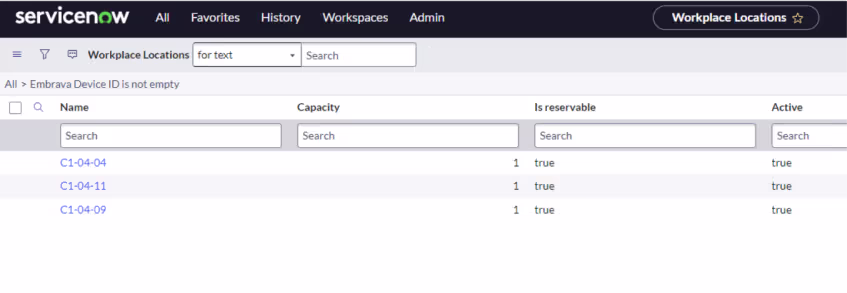
5.
When all spaces have been associated with their Embrava Device ID the full list can be seen by navigating to All → Embrava Workplace Reservations → Workplace Location → All Embrava Locations.
Note:
• For bulk workspace to Desk Sign imports, ask your ServiceNow administrator to perform an import into the Workplace Location table (sn_wsd_core_workplace_location) populating the Embrava Device ID column.
• Spaces and the Buildings to which they belong should be configured to have the same time zone.
Follow these steps to ensure your Space and Building time zones are aligned:
1.
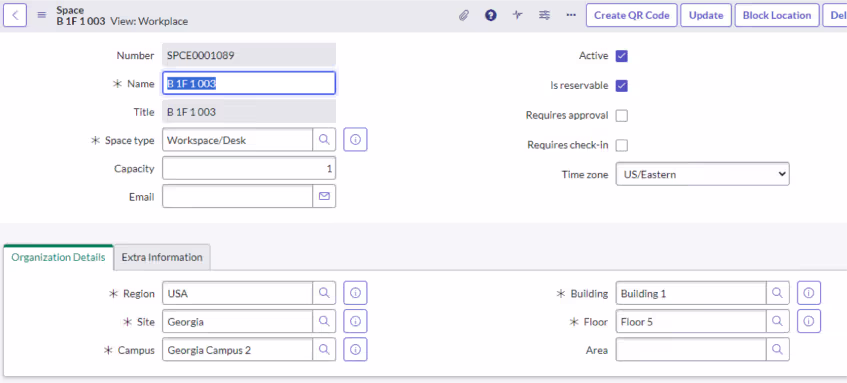
Navigate to All → Embrava Workplace Reservations → Workplace Location → All Embrava Locations
2.
Open the Space form by clicking on the Space Name.
3.
Set the Time zone value and click Update.
Note: an administrator may need to configure the form to contain the Space’s time zone field.
4.
To verify the Building timezone, click on the information button next to the Building field (the (i) button).
.avif)
Note: If a Space has no time zone configured the Embrava Workplace Reservations application will schedule using the Space’s Building’s time zone. One or both of these records must have a time zone value.
You have now mapped your Desk Signs to workspaces in ServiceNow.
Assign Badge Numbers to Users
So that users can tap their security badge on the Desk Sign to reserve a workspace, badge records for each user must be created within ServiceNow.
Follow these steps to manage User Badge records:
1.
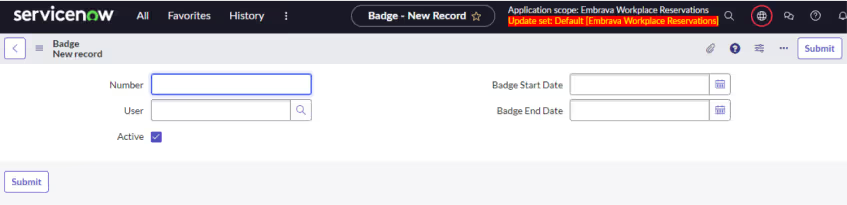
Navigate to All → Embrava Workplace Reservations → Badges.
.avif)
2.
Click the New button to create a new record.
3.
Complete the form and click “Submit”
.
• Number: The user’s badge number [required]
• User: Select the user that owns this badge [required]
• Badge Start Date: The date the badge is active [optional]
• Badge End Date: The date the badge expires [optional]
4.
Repeat these steps for all users of whom you wish to manage their badge information.
Note: for bulk user to badge imports, ask your ServiceNow administrator to perform an import into the Badges table (x_emus2_embrava_wr_badge) table populating the User and Number fields.
You have now mapped your Badge Numbers to Users in ServiceNow.
This completes the ServiceNow preparation steps. You are now ready to connect your Embrava DMS to your ServiceNow instance.


.avif)


